
This is the first in a proposed series of blog posts that plan to give an insight into the ways we devised to train up our team in hardware hacking tools and techniques. This first post acts as an introduction to the regime to show off each of the challenges we set up to train our team in the basics of hardware hacking. Subsequent posts will focus on how to solve some of the actual challenges used to train our consultants.
It is difficult to find freely available material around the web that takes a person from zero (or almost zero) knowledge up to a competent “hardware hacker”. There are plenty of individual resources for specific hardware out there, but they generally follow a walkthrough of what was done in that specific case and do not necessarily open the mind of the person following the guide on how to make those discoveries for themselves, or teach them to adapt to differing scenarios. The main hurdle is that this is a skill that requires physical devices and tools, which means investment. It also means trying to figure out exactly what hardware to buy and not necessarily having guarantees that it is interesting hardware or still available.
This was a problem we came up against for training up our own team. Sure, we could send people on intensive training courses, but that is not always feasible and places limits on who can join in; it is also possibly too much for someone who wants to ‘test the waters’ to see if hardware hacking is something they are passionate about.
The problem came about when we realised only a subset of people knew ‘hardware hacking’, despite interest from other members of the Team, and that people could not really ‘get involved’ easily without specific training sessions. Our solution was to set about developing our own internal training regime that is largely self-contained. Since it has been successful internally, we have decided to share the fundamentals of it with the wider world, so others can build on this foundation and join in with the hardware fun!
The training regime
The overarching approach for our training regime is relatively straightforward: provide the technical theory behind something and then have the learner apply that practically. Then repeat until a good enough general understanding of hardware is achieved, so that given an unknown (i.e. purchase of a random device to play with or a customer-facing engagement), the individual would know how to approach the assessment based off past experience of both security consultancy in general, and applied hardware knowledge.
So really, it is just the tried and true ‘theory-practical’ approach, working from the basics up to more complicated endeavors.
At a really high level, the training regime looks like this:
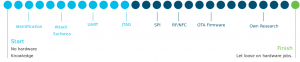
Training plan
To achieve skills in each of the above, we have a decent selection of largely ‘random’ hardware, ranging from old production equipment, cheap items purchased specifically for our team to practice on, and even donated items. These devices have been played with and then ‘challenges’ formed from them, each focusing on a specific attack vector. Here is a – pretty terrible – collage of some of the hardware devices we use for training purposes:


Collage of hardware
An astute hardware hacker may notice many of the devices are indeed of the cheaper off-brand variety. This is intentional for both cost purposes (especially replacement) and because they are usually easier to train people on, due to the more spartan and utilitarian design (cost efficiency) of cheap devices.
While we do not set a strict timeline, we try and give those coming from a zero hardware knowledge background a week to finish the initial training challenges and any associated research/reading required to complete them. We then delve into this list below, explaining what each challenge is and the aims and objectives for the learner. Each challenge focuses on a key element of hardware hacking, meaning that by the end of the training the learner has a decent grasp of the basics of hardware hacking and they can go off and research more advanced techniques in their own time.
In addition to the challenges described below, we have a fairly extensive wiki which covers the basic theory behind each element of the training, which can of course be bolstered by the individual doing their own research to expand on concepts we explain. With the theory in place, they tackle each challenge.
Hardware basics
The first foray into hardware hacking starts from first principals to teach some of the required core skills, such as:
- Initial device disassembly
- Reading a PCB – understanding components, layers and traces, silkscreen, markings, etc.
- Identifying points of interest – chip identification, basic searching techniques and pinouts/headers identification
- Individual pin identification (especially ground) and basic multimeter use (continuity and resistance testing)
- Basic electronics and safety – i.e. do not hold a board with fingers lodged around capacitors near the power input whilst a device is powered on (not that anyone on our team has ever done such a thing *cough*)
- Google Fu – this is especially useful in searching for things like datasheets for chip pinouts, available debug interfaces, etc.
The challenge
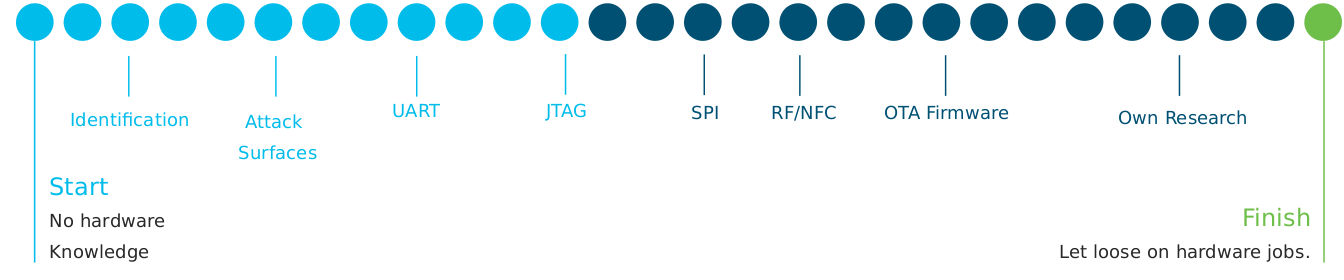
After reading the basics training, the related challenge involves giving an ‘unidentified’ hardware device to an individual and asking them to threat model it, or put more simply, ‘tell us about it’. As expected, it roughly involves identifying and enumerating everything possible regarding the device: its features, components, datasheets, pinouts, what might be of interest to attack and how.
For our challenge, we use a board once used as part of an access control system which has had any immediately identifiable labels removed, such as the one below:

Component identification challenge
UART training
UART (Universal Asynchonous Receive/Transmit) is a really simple interface to work with and if you are lucky enough to find the right device, it can be an easy win. It is also a relatively simple interface to talk to/get working – it is generally only a receive pin and a transmit pin (alongside ground of course). All that is required in addition is some sort of serial to USB adaptor (these are cheap), some jumper wires of the right kind and an application to talk over the USB-serial interface (screen, minicom, putty, etc).
For these reasons, we think it makes a great introduction to the ‘hands on’ part of hardware hacking, without too much complexity or struggling to figure out whether or not wires are connected properly or software has gone wrong. It can help build confidence in connecting things to boards without too many hurdles or complexities to consider. So essentially, the following is taught:
- Pin identification
- Pin connection techniques
- Serial-USB knowledge
- Basic multimeter use (mainly to identify ground and follow traces)
- The requirement for patience and trial and error. Quite often, connecting pins correctly can be fiddly
The challenge
The objective of our basic UART challenge is to identify, enumerate (figure out baud rate and pinout) and then connect to UART and get a root shell on an old VoIP phone. As the first hands-on session, the device we chose gives up its root shell very easily, once the correct connections are made.

UART challenge
A more advanced version of the challenge regards some modifications that are needed to ‘get access’ via UART is planned, but that is very device specific and we are waiting to obtain a good device that would make a compelling challenge.
JTAG training
JTAG (Joint Task Action Group – yes the standard is named after the group who made it) is a good next-step in learning how to connect to points on a board. It is another serial debugging interface of sorts. It usually requires a bit more enumeration at the outset, due to the presence of more pins, but this can be easily tackled with the right equipment. On top of learning how to use some basic hardware tools, the real strength of JTAG is the potential for some on-chip/in memory debugging. Overall, for JTAG, we try to teach:
- Identifying and understanding JTAG
- JTAG pinout
- Using some basic hardware tools for enumeration (such as a JTAGulator or some other microcontroller running JTAGEnum)
- Basic on-chip/memory debugging via JTAG using OpenOCD and devices like the BusPirate and the Shikra as interfaces
The challenge
The challenge covers the points outlined above and is designed to build confidence in interfacing with boards at a hardware level. It involves locating and determining the pinout of a JTAG interface on a smart home controller, then enumerating the pinout using suitable hardware, followed by using OpenOCD with a suitable profile (which may require some google-fu). Finally, the user has to find and extract some specific data from memory to show the challenge has been completed.
The below is a picture of the board we use for training. Can you spot the JTAG interface?
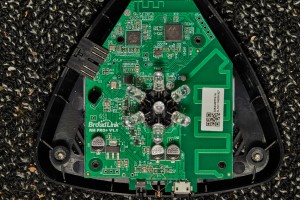
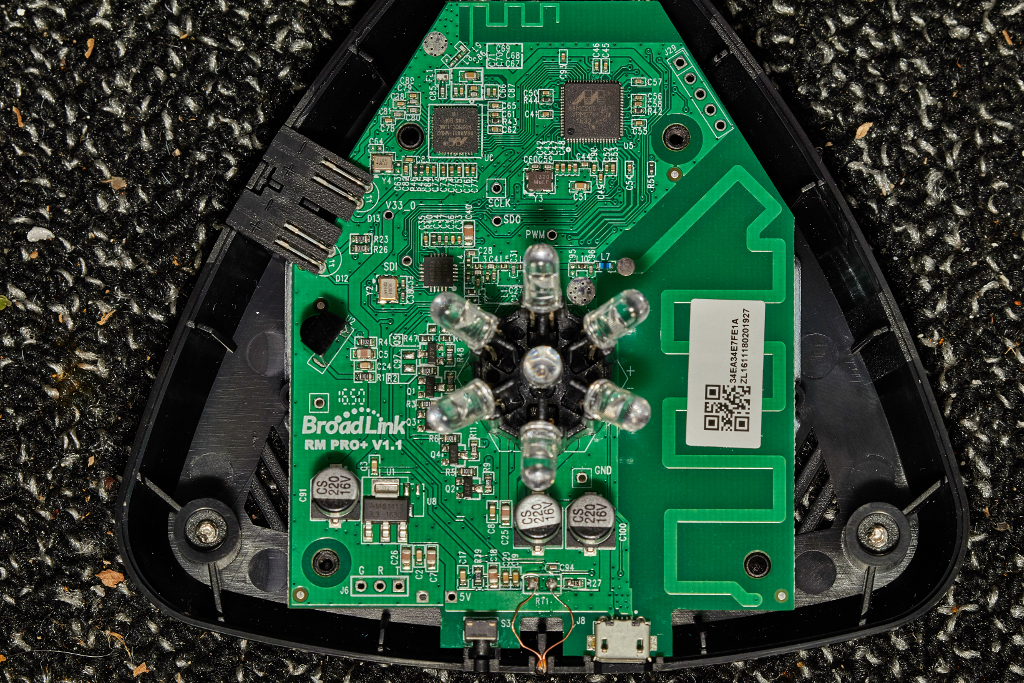
JTAG challenge
Pulling and rewriting/reversing firmware OTA (Over the air)
This part of the training focuses on some of the more software-focused skills and dealing with small embedded devices, specifically, it aims to teach:
- Familiarity of working with a small embedded device
- Performing “Man-In-The-Middle” attacks on an over-the-air (OTA) firmware update
- Simple modification of a firmware binary
- Subversion of simple firmware protection techniques
Alongside this, skills for standard web application techniques in the context of IoT devices are also used/required, but not taught as part of our hardware hacking training.
The challenge
The objective is to rewrite the firmware on the device. This involves performing a MitM (“Man-In-The-Middle”) attack on an OTA firmware update, followed by grabbing the firmware from the server, reverse engineering it, figuring out where the protection is and subverting it. At this point, the trainee has to find a way to force the device to load a modified version of firmware.
For this challenge, we use a small ESP 8266 styled microcontroller running a simple web server which could used for firmware updates, alongside a separate server hosted on our own network which is used to deliver the firmware update.
8266′s look like this and are easy to both write firmware for and to configure with something like esptool:


ESP 8266 OTA update challenge
SPI flash training
Learning about SPI can open up a world of information gathering and modification to a hardware hacker, but it can be fiddly to get to grips with. We aim to teach:
- Tools and techniques to extract SPI flash, primarily via the BusPirate
- Learn how to read SPI flash contents
- SPI flash modification
Soldering and de-soldering are covered in separate training.
The challenge
For this challenge, we use another ESP 8266 microcontroller. This time, however, it is connected to a breadboard with a SPI flash chip mounted separately for easy removal and reconnection. We do this so that we do not end up in a situation where everyone who wishes to do the training has to de-solder (and later reconnect/re-solder) a SPI flash chip at the risk of losing the device, which would be annoying for everyone and fill up a bin of broken hardware.
The challenge requires the trainee to ‘dismount’ the SPI chip, and connect it up to their laptop appropriately so that the contents of the chip can be read. The objective is to obtain credentials for the web server hosted on the device. Once obtained, the chip should be remounted and the credentials used to authenticate onto the web application of the ESP 8266 device.
SDR & RF (Software Defined Radio & Radio Frequency) Training
This part of the training regime focuses on radio wave bands and almost anything wire
less (not including WiFi, as we have a separate service for that). It aims to teach the trainee about the following:
- Use of SDR software and hardware such as Airspy and SDR#, various SDR dongles, HackRF and so on
- Understanding commonly used frequencies and how to monitor them
- Capturing and replaying attacks
- Understanding some of the most common modulation techniques in-use
The challenge
The challenge for this training is currently quite simple – a smart plug which can be turned on and off with a remote and a ‘smart’ doorbell. The objective is to find the bands the devices use, capture the traffic and successfully replay the correct sequence to control the devices from a laptop. Primarily, this challenge was designed to get people used to the tool-chain used in these sorts of scenarios.
Here is a picture of the devices. Hiding the doorbell in people’s belongings and then triggering it when they least expect it has become a fun (annoying) game in our office:

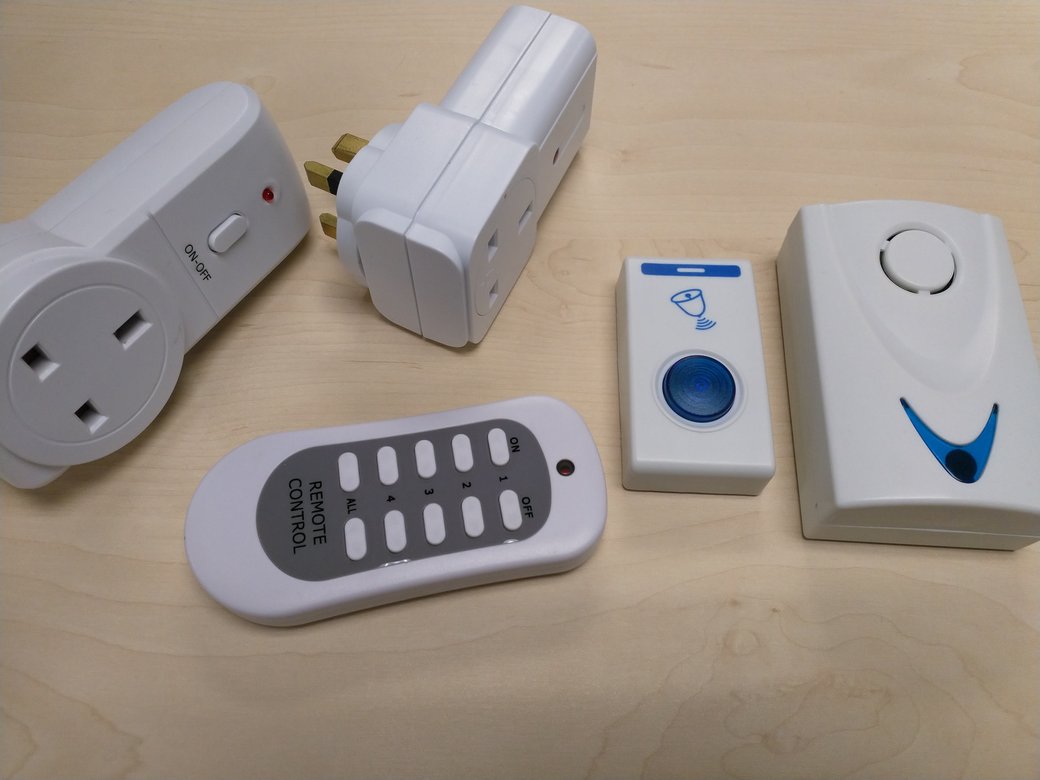
RF challenge
Soldering training
Soldering (and de-soldering) is often required as part of hardware hacking, though it can be fiddly to teach without a lot of time investment.
For our training, we have some devices that are cheap and can be soldered on to – generally we will teach soldering on pins for connections. But perhaps more appropriately, trainees are encouraged to go and buy a project such as a DIY clock with numerous LEDs and practice on that. We also encourage the use of bread-boarding.
To help with this, we keep some cheap soldering irons (to go along with our more expensive ones, which are reserved for trained hands) in the office. Overall, we attempt to teach the following:
- All the usual safety stuff
- Skills in soldering and de-soldering, primarily chips
- Understanding of soldering tools and techniques (flux, solder wire, different types of tips and temperatures, etc.)
- Basic bread-boarding and data extraction
- Hot air rework station use
- Gauge soldering skill, to know who has a deft hand at it (some people simply don not have steady hands; I count myself among them)
We do not have a specific challenge to complete this training, instead relying on observing the soldering skills of an individual.
Next steps
After completing the training regime challenges, we hope our consultants go out and take apart interesting devices of their own accord (assuming they have permission). To help with this, we have a number of cheap hardware devices which are not part of the training, but make for good fun and practice. When a consultant feels comfortable and has solved enough challenges, they can be considered billable.
Other ideas
We have ideas for future improvements to the service, both in terms of training content and challenges. We keep our eyes peeled for interesting or unique devices we come across that we may consider as a more advanced challenge for our team. Devices lying around the office are often disassembled out of curiosity (permission granting). As with any organisation, we have internal pages for trainees to follow, which are continuously being updated by members of the Team.
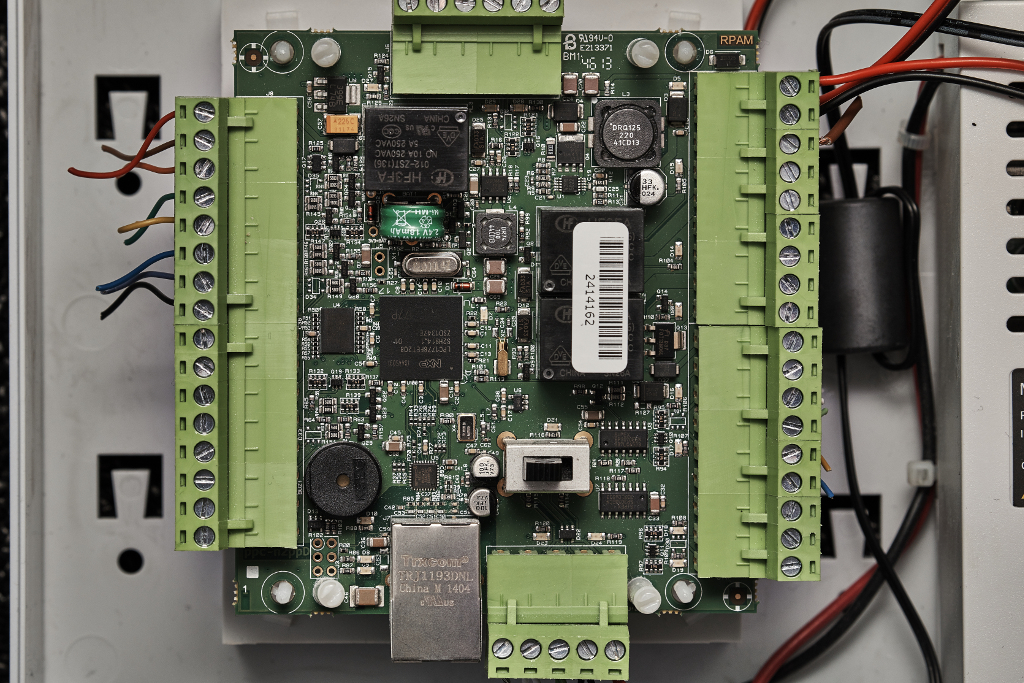
In the next part of this series, one of our recent interns Dan, discusses how he went about solving the UART challenge.
Happy hardware hacking!